ALL THE NAILS
  • BLOG
  • GALLERY
  • TUTORIALS
  • TIPS & TRICKS
  • REQUESTS

Pink Triangles

5/3/2014

1 Comment

 
There's really nothing special here.  I really just wanted to try my new neon pink and I have been doing too many simple gradients lately, so I jazzed it up a bit with some sparkly triangles.
I believe this picture was taken a few days of wear.
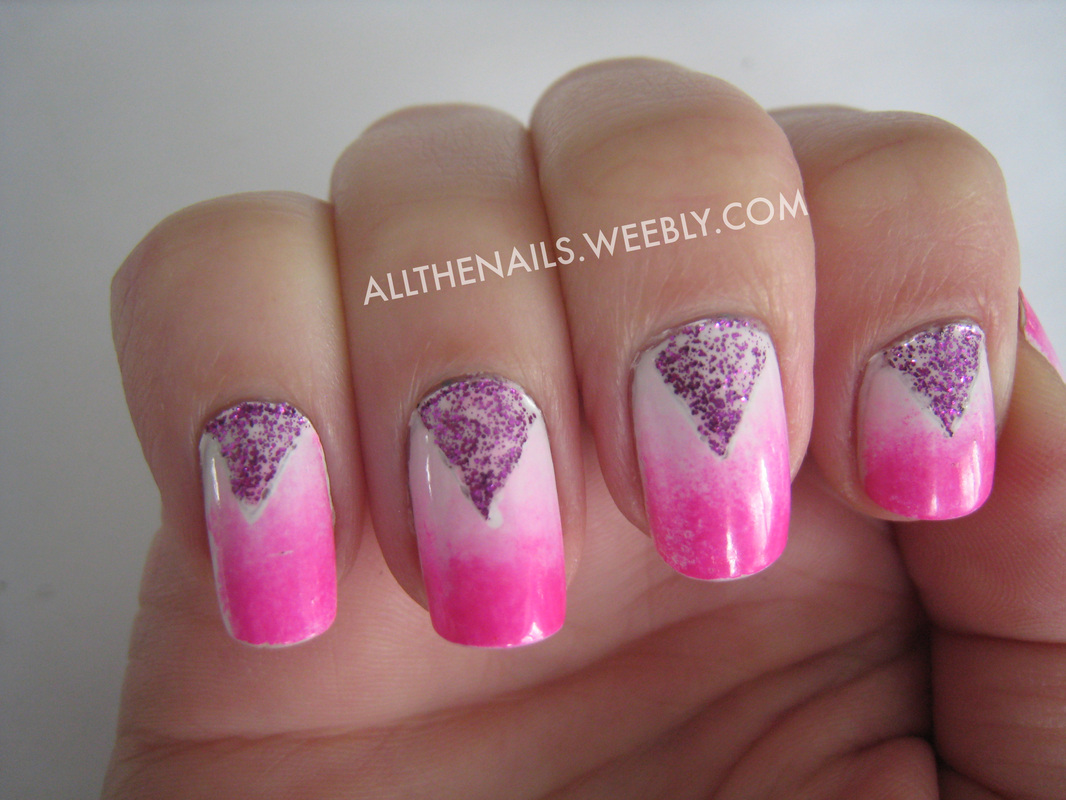
Picture
Tools Used:
Scotch tape
make-up sponge

Polishes Used:
White - China Glaze # 023 White on White
Pink - China Glaze #1008 Purple Panic
Pink Sparkle - Sinful Colors #1161 Poparazzi
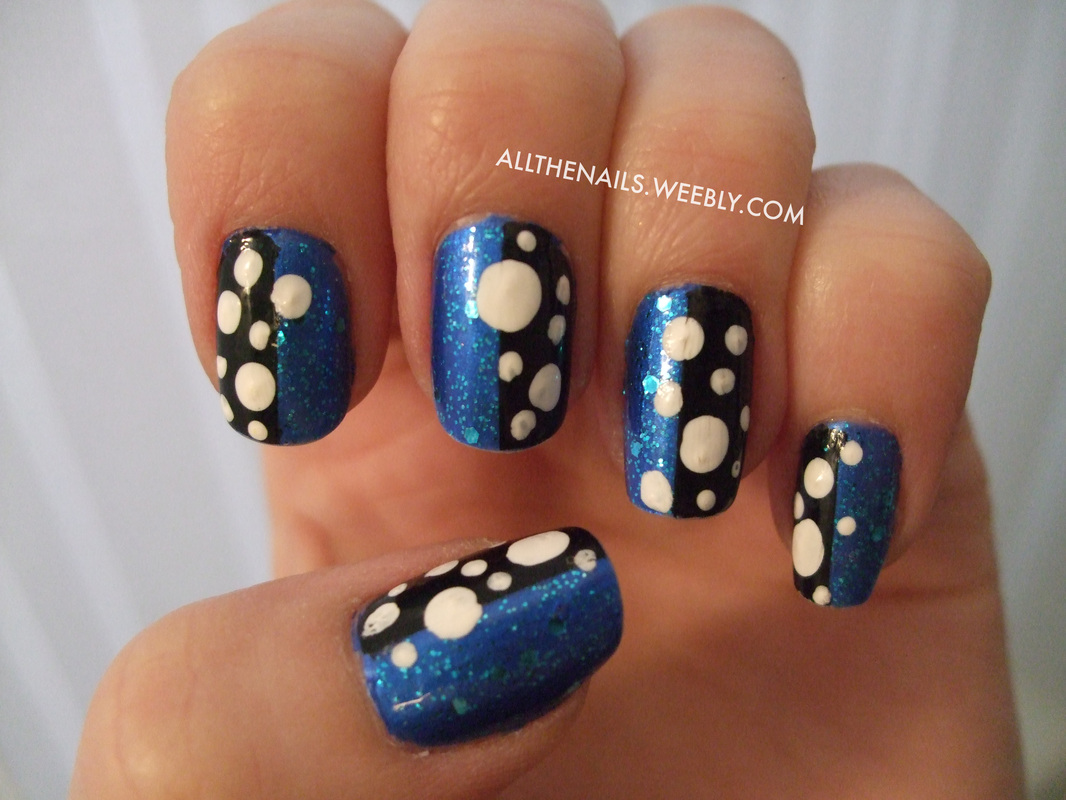
1 Comment

Blue & Black Bubbles

4/6/2014

0 Comments

 
Picture
Tools Used:
Scotch tape
Dotting tool

Polishes Used:
Blue - China Glaze #634 Frostbite
Blue Sparkle - Sinful Colors #1165 After Party
Black - Orly #40484 Liquid Vinyl
White acrylic paint

0 Comments

White Matte Flowers

2/9/2014

0 Comments

 
Picture
Polishes Used:
White - Sinful Colors #101 Snow Me White
Gray - China Glaze #652 Recycle
Silver - Sally Hansen X-treme Wear #220 Celeb City
Pink - Maybelline Express Finish #250 Berry Boucle
Matte Top Coat - Sephora 

Tools Used:
Stamp - Mash-37
Dotting Tool
0 Comments

Black to Blue Gradient: Take 2

8/21/2013

0 Comments

 
You might remember that I've done these before, but I got very shitty cell phone pictures.  So here they are in natural light with a decent camera!
I did these for a wedding I went to.   I've said it before and I'll say it again, if you haven't gone out and bought these polishes and tried this yet, YOU MUST!  I promise you won't be disappointed.
Picture
Tools Used:
Make-up Sponge

Polishes Used (in order of application bottom to top):
#1 Black - Orly #40484 Liquid Vinyl
#2 Blue - China Glaze #1167 Want My Bawdy
#3 Blue Sparkle - China Glaze #857 Dorothy Who?
#4 Bright Blue Sparkle - Sinful Colors #1165 After Party

0 Comments

Summer Cloud Mani

4/23/2013

0 Comments

 
So I thought to make up for my long absence, I'd post one more set!  I wanted to use some summer colors to cheer myself up since Minnesota is being continuously dumped with snow.  I figured I hadn't done a cloud mani in a while, and these colors were perfect for it!

This is the one I'm currently wearing and the picture was taken 2 days after I painted them WITHOUT a top coat.  I know I know!  How dare I NOT use Seche Vite!  My only reasoning is I was feeling particularly lazy that night.  Deal with it :P
Picture
Polishes Used:
Orange - Sally Hansen X-treme Wear #150 Sun Kissed
White - Sinful Colors #101 Snow Me White
Blue - Sally Hansen X-treme Wear #130 Blue Me Away
0 Comments

Wing Nails

4/23/2013

0 Comments

 
Aaand I'm back!  It's been FOREVER since I've posted new nails, and for that I apologize.  I recently bought my first house and a week later I took a 4-day road trip to Dollywood (yes, that is Dolly Parton's amusement park and it was wonderful).  So needless to say, my nails haven't quite been my top priority as of late.  The day I bought the house, I quickly painted my nails with China Glaze Dorothy Who with a splash of Sinful Colors After Party on the tips.  It was a very bright sparkle with just a hint of a gradient and  that mani lasted TWO WEEKS before it was noticeably chipped!  I was amazed.  So to get back into the swing of things and to practice my mani for a friend's wedding in Des Moines this weekend, I did these wing-type nails.  

Fun Fact:  If you're going to replicate this mani, put the glitter on first and then paint the wings with a fine liner brush.
Picture
Picture
Tools Used:
Liner brush

Polishes Used:
Glitter - Sally Hansen #120 Diamonds
White - Sinful Colors #101 Snow Me White
Silver - Sally Hansen #220 Celeb City
Black - Orly Artistic Liner Black
0 Comments

Game of Thrones Fail Nails

3/31/2013

0 Comments

 
I had big plans for these Game of Thrones nails.  I speckled them like rocks and I was going to paint a giant dire wolf running across them.  As I finished the head on my ring finger, I realized I had angled it such that there was no room for the body and the head didn't look like a head anyway.  So I painted over it with black and silver glitter and I think they turned out pretty rockin'! 

See how I got the splatter effect below!
Picture
So to get the splatter effect, I first painted my nails white.  Then I watered down some black acrylic paint.  Not too watery, but enough that it wasn't clumpy.  Then I wrapped my thumb in aluminum foil in a way that gave me a ridge along the bottom of my thumb.  This way, I was able to flick the bristles of the toothbrush without ruining the paint on my thumb. 
Picture
Picture
Tools Used:
Aluminum foil
Toothbrush

Polished Used:
White - Sinful Colors #101 Snow Me White
Glitter - Nicole Modern Family #NIF10 Luke of the Draw
Black acrylic paint
0 Comments

Tie-Dye Nails

3/31/2013

0 Comments

 
My sister and I went to see Pauly Shore perform live so I did these tie-dye nails for the occasion.  I think they were very fitting for The Weasel.  AaaOooOOooHHhhhOOOooOo!!
Picture
And here he is the best picture I got of him.  He is drinking from a fish bowl he pulled off an audience members table.
Picture
Tools Used:
Detail brush
Liner brush

Polishes Used:
White background - Sinful Colors #101 Snow Me White
Red, Orange, Yellow, Green, Blue acrylic paints
0 Comments

Black Matte with Blue Glitter Half-Moons & Glossy Tips

3/25/2013

0 Comments

 
Yes, the title is a bit lengthy, but how else would you describe these?  Well, I suppose "striking" would also work.

There's a mini-tutorial below.
Picture
Go Go, Mini Tutorial!
Step 1: Paint 2 coats of black
Step 2: 2 Paint a matte top coat
Step 3: Carefully dab your blue glitter on to create the half-moons (I used 2 different blue glitters)
Step 4: Paint just the tips with a clear coat
Easy-peasy lemon-squeezy!

Polishes Used:
Black - Orly #40484 Liquid Vinyl
Blue Glitter #1 - China Glaze #857 Dorothy Who?
Blue Glitter #2 - Sinful Colors #1165 After Party
Matte Top Coat - Sephora
Top Coat - Seche Vite Dry Fast Top Coat
0 Comments

Black to Blue glitter gradient

2/16/2013

0 Comments

 
I bought China Glaze "Dorothy Who?" today and could not resist using it immediately.  So I came up with this spectacular black to blue glitter gradient.  I used 4 different blues to get this dazzling effect and I applied it with the simple sponging gradient technique.  Seriously, this picture really does not do this manicure justice.  The blues are so bright and perfectly blended with amazing sparkle!  If you can, I urge you to pick up these polishes and do this mani yourself.  You will not be disappointed!
Picture
Tools Used:
Make-up sponge

Polishes Used (in order of application bottom to top):
#1 Black - Orly #40484 Liquid Vinyl
#2 Blue - China Glaze #1167 Want My Bawdy
#3 Blue Sparkle - China Glaze #857 Dorothy Who?
#4 Bright Blue Sparkle - Sinful Colors #1165 After Party
0 Comments

    About Bailey

    I'm 29 years old and I just moved to New York City with my boyfriend and little monster dog.  I've been doing nail art off and on since I was a kid...that's about 17 years!  But I really got back to it about 3 years ago. 
    As you can probably tell, my inspiration comes from my love of TV shows, movies, games, and other miscellaneous pop culture.

    Picture

    Archives

    November 2014
    July 2014
    June 2014
    May 2014
    April 2014
    February 2014
    August 2013
    May 2013
    April 2013
    March 2013
    February 2013
    January 2013

    Categories

    All
    Acrylic Paint
    Bacon
    China Glaze
    Clouds
    Doctor Who
    Elegant
    Essie
    Firefly
    Flowers
    Freehand
    Galaxy
    Gradient
    Halloween
    Hand Placed Glitter
    Magnetic
    Matte
    Maybelline
    Nail Art Pens
    Nerdy
    Nicole
    Opi
    Orly
    Pure Ice
    Sally Hansen
    Sephora
    Sharpie
    Sinful Colors
    Stamping
    Star Trek
    St Patty's Day
    Taping
    Trees
    Ulta
    Water Marble
    Zoya

    RSS Feed

Powered by Create your own unique website with customizable templates.